
How-To Guide: Hard and Soft Matching Applications
The following article includes details on how to model a matching function in your Assessment Framework or other application.
What is Matching?
The matching function is a standardized set of logicnets and data tables that you can integrate into any application where you need users to select matched records. During runtime, the matching logicnets interpret the user's input against a set of defined parameters and generate from the complete target list of possible matches a list of hard matches (where the record meets the criteria) and soft matches (where the system provides a sorted list of best-fit matches based on preset weights).
Use Cases
You can use this function in many different types of application; for example, in helping a user choose appropriate vendors from an approved list or to select the best products that meet customer needs.
Some use cases focus on hard matches, where the system rules out a choice if it does not meet all parameters. Other use cases recognize that parameters have different levels of importance and the system lists choices based on their total weight for the parameters specified. You can also combine the approaches so the system switches from hard matching to weighted matching if no choice meets all criteria. In the most complex scenarios, its possible to set the system to review choices based on some minimum mandatory criteria being met and use weighting for the other factors.
This article focuses on the modeling steps required to create a hard- or soft-matching application where the possible targets are in the Low to Medium range (10-100+). Note that this approach may slow down system performance if the number of possible targets gets too high.
How it Works
Because the matching function is built directly as a logicnet, you can integrate it into business applications in multiple ways. The system can perform the matching in real-time, narrowing down the verified choices as the user provides more details or constraints on what parameters are important. Alternatively, you can call the matching logicnet only after certain business criteria are met, or as part of any final analysis once the complete assessment is finished. Similarly, your application can present the outcome of the matching in the most appropriate way for the application -- as a single, "best fit" match or as a table of analysis for the user to review results and perform "What-If" analysis.
Matching Function Components
In its simplest form, you can apply the matching function to any data in a logicnets model that are available in a data table. You specify the name of the table holding the business data set for match targets as part of the modeling configuration. This is called [MATCH_TARGETS] in the article below.
Note: You can also apply matching to JSON objects or collections with some level of professional services support from LogicNets, based on a specific scenario.
The components required for the matching function to work against the data set consist of the following:
- MATCH CRITERIA - A list of criteria to be assessed against the match targets with each criterion including:
- the attribute of the match targets (e.g. vendor location)
- the variable in the assessment that is populated by the user and the answer compared to the attribute above
- the rule of comparison, including all of the following:
- equals (=)
- not equals (<>)
- greater than (>)
- greater than or equal to (>=)
- less than (<)
- less than or equal to (<=)
- contains text (like %[textstring]%)
- exists in (checklist)
- MATCH RESULTS - A table of the matches/weights calculated for the specific runtime scenario. The system updates this table as the user provides new/alternative answers to the criteria variables.
- Matching function logicnet - A logicnet that is called from a logicnet presenting the results. This is in the report folder in the Assessment Framework.
- Match initialization logicnet - A logicnet that runs one time from the onstart folder during session startup.
- Match output logicnet - A logicnet that can be incorporated into the report side of the application to present the results of the matching.
- Two output collections that can be linked back to meta data to present the results on screen:
- hard_matches collection: A list of the [MATCH TARGET] record ids that match ALL of the specified criteria.
- rankings collection: A full list of all [MATCH TARGET] records, with their hard match count and total attributed weight.
- (Optional use) a matching criteria call and form logicnet that can be incorporated into your model to provide runtime user access to criteria and weights to support "What-If" analysis. In this scenario, the MATCH CRITERIA table acts as a default and source list for variables that can be incorporated into the match.
You can use the two output collections and/or the MATCH RESULTS and [MATCH TARGETS] tables to present the matching result with as much detail as required. In some applications, the top match could be propagated into subsequent areas of the program by default. In others, you can present the full results of the matching function to allow the user to see the best outcomes, while still retaining manual control over the final choice.
Integrating Matching into Applications
You can run the example project below in TEST mode to see the matching function at work, and you can view the logicnets that drive this for information/understanding. To integrate matching into your own application, review and follow the steps outlined below.
Step 1: Create your Match Records in a Table
You may already have a table of records to be matched to user input, and this table can consist of any number of records and any number of parameters. Make sure to name the parameter columns clearly so that it is easier to recognize the parameters for use in the match criteria.
If you are creating a new table, remember that table column names cannot include spaces; use "number_of_colors" or "max_bandwidth" instead of "number of colors" or "max bandwidth". It is also best to avoid the added complexity introduced by using columns with leading numbers (e.g. avoid using column names like "2_color", or "1099_compliant").
Use the Import Table option in the Designer to load a .CSV or .TXT (tab delineated) file directly from your local drive.
Step 2: Import and Create the MATCH_CRITERIA and MATCH_RESULTS Tables
Examples of these can be found in the documents folder of the example project.
- Navigate to the document folder of the sample project below and download to your local drive the two files relating to these tables.
- Go to the /resources/data folder and import these tables from the files. Note: You will need to type in the table names.
- Once you have created the tables, and after noting the syntax of the matching rules especially, you can remove the sample data using the delete all data button.
IMPORTANT: Step 2 allows single-user testing. For multi-user testing and/or production installation, the MATCH_RESULTS table needs to be set up at the SESSION level. You can do this manually by using the NEW TABLE button, or you can request help from your LogicNets contact to switch the imported table to be session-based on the server. If you use the table as-is, multiple users' match results will be intermingled and will lead to erroneous results.
Step 3: Copy the Match Initialization Logicnet/Nodes into the Onstart Folder and Define [MATCH_TARGETS]
Copy the match initialization logicnet into the onstart folder, or copy the nodes into an existing logicnet there. These nodes perform some one-time configuration to define the [MATCH_TARGETS] table, load the matching criteria table into the context, and to create the list of match parameters in preparation for the What-If feature.
IMPORTANT: In the first node, set the matching_table variable to your table name. This is case sensitive.
Step 4: Populate the MATCH_CRITERIA Table
For a fixed set of criteria, create the criteria to be applied to the data set by choosing the following for each criteria (row):
- from the first dropdown, choose a column from the [MATCH_TARGETS] table
- select a rule from the list
- enter the full path of the variable name from your modeled questions
- enter a numeric weight or default to the same number (e.g. 1) if all criteria are to have equal impact to the soft matching.
- specify a "human-readable" name for any criteria NOT matched.
See the notes below for further instructions on optionally setting up these criteria as a default, while providing the UI to allow users to perform What-If analysis during runtime.
Step 5: Copy the Matching Function Logicnet into in your Application in a Library/Misc Folder
Step 6: Integrate the Matching Logicnet
You can integrate this function in numerous ways. One of the simplest approaches for use with Assessment Framework applications is to call the matching function logicnet from a logicnet in the report folder.
Create a call node and select the matching logicnet. Click on the Parameters tab and enter the following:
- the name of your business data table holding the match records.
- the name of the matching criteria collection (this should be matching_criteria).
Step 7: Link Matched IDs Back to Other Meta Data to Enhance the Display of Relevant Information
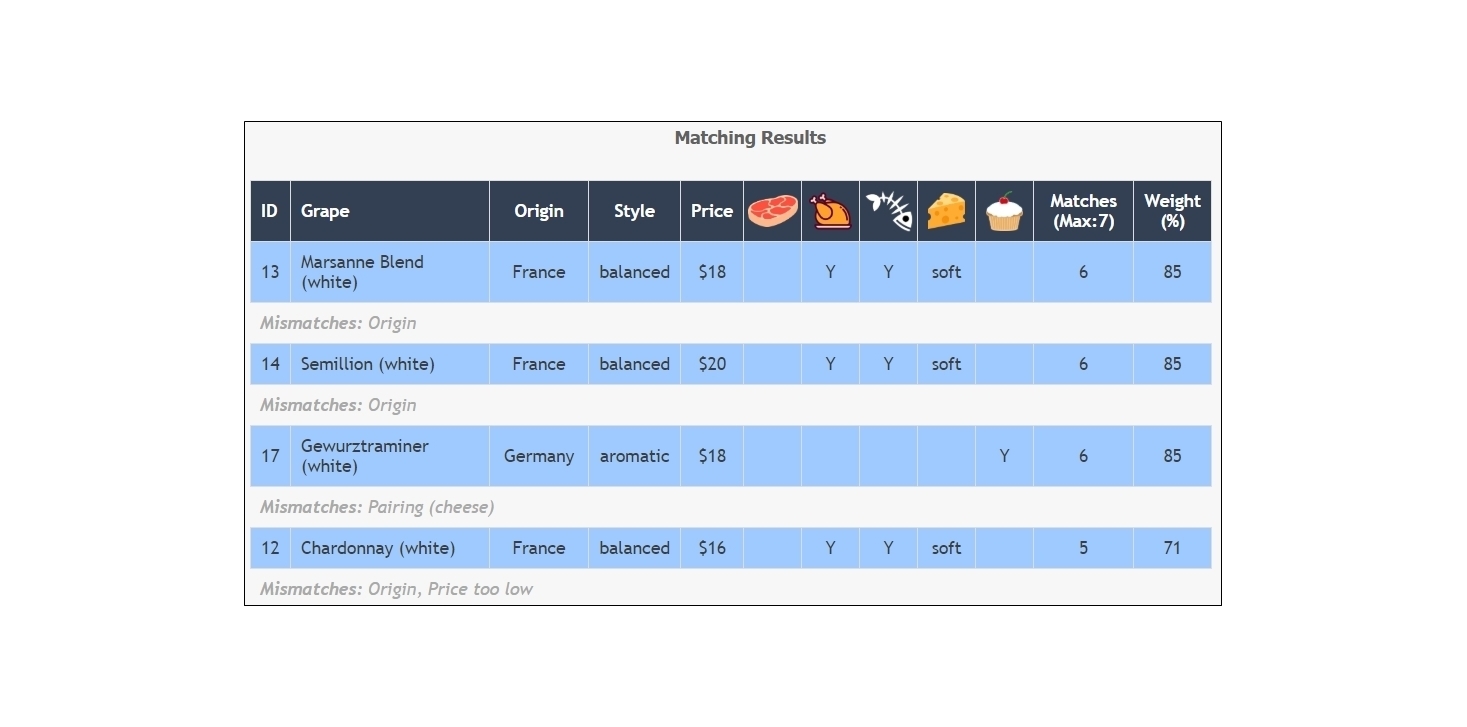
The system creates as outputs two collections called rankings and hard_matches, and you can incorporate these into the output the same way as with any other collection. For Assessment Framework applications there are two recommended ways for doing this:
- use jsgridpart (SIMPLE) to capitalize on basic functionality and styling.
- use report item part (ADVANCED) for more advanced possibilities in terms of layout, including showing the mismatch items.
In the example project, both of the above are modeled, along with specific styling that is managed by the CSS. To connect the advanced formatting, replace node 210 with node 110 in the match output logicnet.
Step 8: Copy/Adjust the Relevant CSS from the Custom CSS File Included in the Example Project
You can add styling that includes such features as colors and column widths in the final application. Review the CSS in the Matching and JS Grid sections of the CSS file and copy or adjust for your own application.
- /*** MATCHING CSS ***/ section contains the CSS related to the advanced approach to display using the report-item part.
- /*** JS Grid Styling ***/ section contains the CSS related to the JS Grid approach.
Example Project
Please download this Matching Example (Hard and Soft) project into the Designer to see the matching function demonstration.
What-If Analysis
The basic implementation of the matching function uses the matching criteria specified by the Designer user in the MATCHING CRITERIA table. To allow the runtime user to impact the matching criteria, it is possible to present an editable table as follows:
- add the matching form logicnet (in a subfolder of forms)
- in a form folder logicnet (new or existing) add a call node and call the matching form logicnet
These steps put the matching criteria information into the UI so that the runtime user can remove/add any criteria, change weight, and change the rule name.
Reply
Content aside
- 3 yrs agoLast active
- 124Views
-
2
Following