
Customize a Starter App Example Project (Release 8.1+)
Introduction
The information below helps walk you through the process of customizing a Starter Application and linking it to one or more projects created using another LogicNets framework, such as the Assessment Framework.
Because this information is for demonstration/instructional purposes we have used generic data object names, such as "meta1". To create a Starter Application intended for production use, please discuss your project data model with a LogicNets representative and consider updating this example.
This project has been updated for Release 8.1+ and includes a number of enhancements on the prior Starter App Example project, which is still available here. These enhancements include the following:
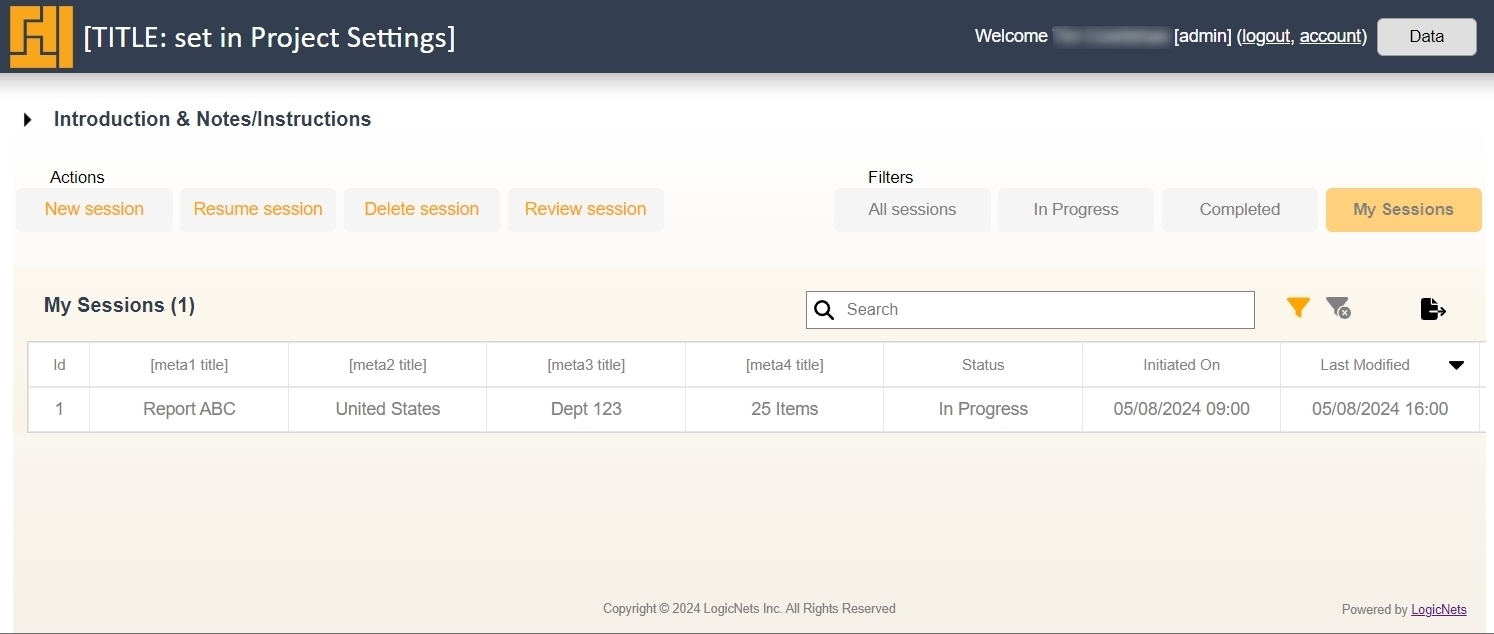
- A collapsible section you could use for an introduction and/or instructions for use
- Filters to show sessions in progress, completed, or those modified by the current user
- Ability to have new sessions either start the same protocol or give the user a choice of multiple protocols. See Multiple Protocols section below.
- Ability for resuming sessions to either use the same protocol version as originally used or assume the latest protocol. See Resuming Latest Version below.
- Enhanced styling, including the freezing of the grid headers
This example project aims give novice Designer users a head start on their application starter, which designers often use as the initial "landing page" for LogicNets applications, at least in initial stages of design and development. You can customize the example, alter it, or remove customizations that are not relevant to your application.
Preparation
Complete the following steps prior to customizing your Starter Application:
- Determine the project and published name(s) of the Assessment Framework projects your Starter App will call.
- Identify the variable names for up to 5 key variables you want to display on the Starter Portal; for example, "department_name".
- Identify the titles for each of the variables identified above; for example, "Department".
- Create a new Starter Application project in the Designer account where you created your other application(s), using the attached Starter Template project. You can also choose Standard from the New Starter Application Framework choices when you start a new project in the Designer.
STEP 1: Specify the Application(s) to Launch
By default, the Starter Application opens a blank copy of the designated application and starts a new session when the user clicks the New button.
Single Application Launch
To set the name of the application the system should open, do the following:
- In the Project pane, navigate to the logicnet called "starter_configuration" and go to node 10 - "SET LAUNCH PACKAGE CATEGORY".
- Click on the node and the system opens the editor.
- In the "Value" field enter the name of the project category, using the same name as the "blue folder" name.
NOTE: The Designer denoted projects as blue folders. The blue folder text is the "category" of the application. This is different to the published package name that might have a version or date reference. - Click save at the top of the editor to save your updates.
- Verify that the project you referenced is a published project by clicking on the blue folder of the project and clicking the Publish button. Verify there is a listing for the project in the table. It does NOT need to have the same name as the category.

Multi-Application Launch

You can have the system display multiple packages from which the user can choose from when starting a new session, as in the screenshot above. To do this, tag each package and publish a copy, as described in the steps below. See Project Tags for more detail. Once you have done this, the starter_configuration logicnet automatically checks for tagged packages (Node 40). If it finds any, the rule in Node 100 is TRUE, and we set a flag in Node 60 that is used elsewhere in the Starter to change the behavior to manage multiple protocols.
For any protocol to be included in the user choice:
- Navigate to the Tags tab of the project.
- Set the name to AVAILABLE TO STARTER *.
- Publish the project.

NOTE: You must restart the Starter after publishing projects, because the logicnet that finds protocols runs only once during start-up of the Starter Application.
* You can change this tag can to one of your choosing but you must also update the filter in the package and tags-lookup part in Node 40 of starter configuration.
Test Your Updates
To verify that you made your changes correctly, click on your project in the Project pane and click the Test button on the Details tab. Click the New button to start a new session and do the following:
- Watch your application load (single application mode), or
- View the popup choice of protocols (multi application mode)
You can also return to the Starter Application main page by clicking the Submit or Save buttons and look at the grid to see if there are changes in the modified date and status.
Resuming Latest Version
Once a user has started a session, clicking SAVE (or SUBMIT) commits all the user inputs to the Starter App so the system can revive the session at a later date. If significant time has passed or the applications are in early stages of launch you might have updated a protocol for defects or with new sections. This Starter App has been set up with the following default behavior when resuming sessions:
- When opening an existing session in View Only mode (no edits), the system uses the ORGINAL protocol version.
- When opening an existing session normally, the system uses the LATEST published protocol version.
In Scenario 2, if you require that the original protocol version should also be used there, remove node 20 RESUME LATEST VERSION from the starter_configuration logicnet. For more sophisticated scenarios, including how to "translate" variable name changes from an old version to a new version, please talk to your LogicNets representative for more information.
STEP 2: Customize the Columns of the Session Grid
Each time a user interacts with an application it's called a session, and users can start, save, and restart sessions using the Starter Application. The main page of the Starter Application displays prior sessions and important high-level data (meta data) about each session, which allows users to identify, review, and/or restart a session. The system displays this data in a grid/table, and this step shows you how to customize the table with appropriate column titles.
By default, the session grid includes the following columns:
- session id (the unique identifier for the session from the data table)
- meta1 (field available for customization)
- meta2
- meta3
- meta4
- meta5
- created date (date/time stamp of when the session was first created)
- modified date (date/time stamp of when the sesssion was last saved)
- modified by (email of person who last saved the session)
- status
- In Progress - This is the status that displays after the session is created and when the user saves the session.
- Completed - This is the status that displays after the user submits the session.
Customization Options/Steps
To modify the titles in the session grid, do the following:
- In the Project pane, navigate to the logicnet called "main_panel_ui" and go to node 100 - "SESSION GRID".
- Click on the node and the system opens the editor.
- For each column where you want to change the title, click change, type the new name in the "Title" section, and click save.
- Remove any column that is not required by clicking the remove button next to that column.
- Click save at the top of the editor to save your updates to the node.

Test Your Updates
To verify that you made your changes correctly, click on your project in the Project pane and click the Test button on the Details tab. Your column titles should display in the grid.
Advanced Notes
- When using this in multi-application mode, grid columns may reflect data from several different protocol runs, so remember to make the headings relevant for all possible values.
- To display currency or dates as meta data you must change the type in the type column. See the Support Article on DBGrid3 for help.
- You can style the session grid--including colors, column widths, fonts, and other items--by adding styling details to the "custom_css" file under resources/layout/css.
- Adding additional meta data items IS possible but it is a more involved process than adding columns here. We recommend reviewing the steps of the following logicnets for a more in-depth understanding of this (and please reach out to your LogicNets Representative for assistance):
- resume_session and in particular the load data node
- save_session_data to understand how data is written back to the table.
STEP 3: Save Meta Data Values Back to the Grid
When the user has finished interacting with the Assessment Framework-based application and clicks the Save or Submit buttons, the system saves all of the data values for resuming the session in future.
Customization Options/Steps
To set the data values, do the following:
- In the Project pane, navigate to the logicnet called "populate_metadata" and go to node 10 - "meta1_collection".
- This node contains more than one part. Double-click on the part called Query Collection.
- In the "Query" field, replace the variable_name with the data object name from your application(*). The variable must be contained within single quotes, e.g. 'department_name'.
- Click save at the top of the editor and repeat the steps above for each meta data item.

* Variable names are the full path container.data_object names from the launched application that have been specified by the Designer. To refresh memory of these, run that application in TEST mode and answer the questions that contain the meta data to be transferred back to the Starter, then click on the DATA button and search for those values. The variable names can be gleaned from this view.
Each of the the meta data items are set to receive text inputs. If one or more of your meta data items is in date or number format, then do the following:
- In each meta data process node, click the Set Data Object Value part.
- Select the appropriate data type.
- Selection from the format options available depending on the data type.

Test Your Updates
To verify that you made your changes correctly, click on your project in the Project pane and click the Test button on the Details tab. Run your Starter Application and verify that the meta data is updated correctly when you click the Save and Submit buttons. Clicking the Review and Cancel buttons should not change the data.
Advanced Options and Notes
Notes on Status
The "populate_metadata" logicnet also contains the steps and conditions that tell the system to set the project status to In Progress or Completed. To implement a more sophisticated set of stages/status points, you can copy a process node and extract the additional data needed from the project and then model the rules to determine current status. The system updates the session grid with the value held in "variable = status".
The Starter contains filters to show In Progress and Completed sessions. The buttons are shown in the main_panel_ui logicnet and the logic is contained in the main_panel_process logicnet. If you do create new/alternative status states, be sure to review and update the filters to capitalize on your customization.
Meta Data from Multiple Protocols
Given the above approach, if you have common data fields or a similar data model, then regardless of the protocol chosen, the above process will extract the meta data using the variable name accordingly. An example of a common data field might be customer or client_id.
In the event you want to populate a field with a different variable depending on the protocol chosen, then follow the notes below.
- set up a data extraction for each protocol and call them meta1_from_protocol1, meta1_from_protocol2, etc.
When the user has run through protocol 1, there will be no value in meta1_from_protocol2 - after these steps, do a set data object to set meta1 = $(meta1_from_protocol1)$(meta1_from_protocol2) etc. to write the results of each into the meta1 variable.
[Optional] STEP 4: Setting Topbar Values in the Application
When the user is running the application, the topbar at the top of the screen can display key meta data--such as last modified date--so the user is always aware of which session they are viewing/editing. The purpose of this step is to show you how to present the meta data values on the topbar of the application.
Customization Options/Steps
- In the Project pane, navigate to the logicnet called "topbar for AF (Starter-linked)" and form part nodes (in orange) for META1 through META5.
- Click on the META1 node and the system opens the editor.
- Change the contents of the "Caption" field to the title for this meta data item. Because this will display in the topbar, where space is limited, keep the title short; for example, Dept. instead of Department Name.
- Click save at the top of the editor and repeat these steps for each meta data item. NOTE: If you do not use a meta data item you can ignore it.

5. Copy the logicnet you just updated and paste it into the Assessment Framework application. NOTE: Do not paste the logicnet in the forms or reports subfolders.
6. In your Assessment Framework project, go to the Framework settings page and select the logicnet you copied and pasted as the custom topbar.
7. Save and publish the Assessment Framework project, naming it the same name that it had previously.

Test Your Changes
To verify that you made your changes correctly, click on your project in the Project pane and click the Test button on the Details tab. If you have done the above correctly, you can now see the meta data items represented at the top of the screen in the topbar of the assessment application.
Advanced Options and Notes
The meta data and titles associated with status and last modified date can also be customized in the same way in nodes 160 and 170. You can add other meta data items if you want, but you should review how the layout and styling of the topbar because of space restrictions.
In addition to modifying the contents of the topbar, you can also create or update the navigation buttons associated with the Assessment Framework application.
- If your assessment application does not generate a pop-up report or PDF file, remove nodes 60/350 (report_button) prior to publishing the project.
- If your assessment application does generate these, you can customize the button text in nodes 60/350.
- You can also customize the Submit, Save, and Cancel buttons but that action is not described in this article.
STEP 5: Share Your URL
You have completed the steps to customize your Starter Application. Publish this project and you can share the link to the application with authorized users.
WARNING: This Starter Application should not be used for any PRODUCTION installation due to a number of set-up simplifications made. In particular, note that REPUBLISHING the Starter App will overwrite any saved sessions. (For PRODUCTION environments, the session data is stored in a separate database from the logicnet application).
Advanced Options and Notes
In addition to the customizations identified above, you can also use other customizations:
- You can add other buttons or links above the session grid to take users to other URLs.
- You can define and apply user roles to any access buttons. For example, you could set a "Reviewer" role and only allow users with that role to review existing sessions rather than start new ones.
- With additional modelling, you could set the session grid to display only those items for which the user has the right permissions.
- Using the main Starter Portal template (not this one) you can launch multiple applications or work with application versions. This is definitely something to consider for PRODUCTION applications.
Reply
Content aside
- 2 yrs agoLast active
- 39Views
-
1
Following