
0
Configuring ADFS with LogicNets
Description
This document describes how to configure Active Directory Federation Services (ADFS) and LogicNets to allow for single-signon.
Prerequisites
Before beginning the configuration verify that the following items are true.
- The ADFS server is reachable by end users and by the LogicNets Server via port 443 (https).
- The ADFS server is reachable by end users and the LogicNets server via the configured ADFS host names. For more information about retrieving the configured ADFS host names, go to https://docs.microsoft.com/en-us/powershell/module/adfs/get-adfsendpoint?view=win10-ps.
- Read through the configuration of ADFS below and ask your LogicNets Representative to confirm the URLs required.
Configure ADFS
- Open RDP to the ADFS server.
- Open the ADFS Management tool.

- Right-click on Application Groups and select Add Application Group.

- Enter a name.
- Select Server Application accessing a web-api.
- Click Next.
- Copy the client identifier.
- Fill in the redirect URL of your LogicNets installation; for example, https://mylogicnets.mycompany.com/authentication.lns. Select add.
- Click Next.
- Select Generate a shared secret.
- Copy the secret.
- Click Next.
- Fill in any (Relying Party) identifier; for example, https://mylogicnets.mycompany.com. Make note of this, as you will need it later.

- Click Next.
- Select Permit everyone.
- Click Next.
- Select the following scopes: allatclaims, openid, profile, email.
- Click Next.
- Click Next.
- Click Close.
- Open the application group you created above.
- Select the Web API and click Edit.

- Click Issuance Transform Rules.

- Click Add Rule.
- Select Send LDAP Attributes as Claims as template.

- Fill in a rule name; for example, groupids.
- Select Attribute Store Active Directory.
- Add mapping LDAP attribute Token-Groups as SIDs and Outgoing Claim Type Group SID.

- Click Finish.
- Click Ok.
- Click Ok.
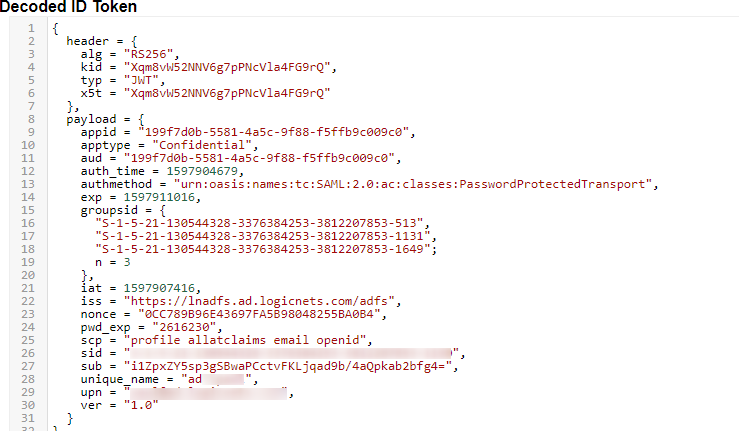
After the above changes in authentication.lua and in the ADFS config the groupids are returned correctly (example below):
ADFS Configuration Disclaimer
Note that LogicNets does not claim expertise in the ADFS client set up. Instructions above may differ from your specific ADFS installation. While we endeavor to support the goal of setting up OAUTH, clients may need to seek online or external advice/expertise.
Configure LogicNets
- Open the settings.cfg file. This can be either the file located at c:\logicnets\dat\bnt\customer\settings.cfg (this is the company-specific settings file) or the file located at c:\logicnets\dat\settings.cfg (this is the system-wide settings file).
- Add the following configuration to the end of the file and fill in the items noted in yellow below.

Note: Via PowerShell it is possible to retrieve the AD Group IDs; for example, Get-ADGroup -Identity "Domain Users" or Get-ADGroup -Filter retrieves info (example screenshot below) from where you can note down the SID.

- Save the settings.cfg file.
- Test whether you can log in by selecting Active Directory on the login page.

- Optionally, you can disable local user accounts. Local accounts are disabled by adding the follow line to your settings file: _context.OAUTH_MODES._local = 0
CAUTION:
Disabling all local accounts may cause operational difficulties if/when your ADFS server is down.
Consider retaining at least one administrative local account for this eventuality.
Also, the installation folders contain an adduser script that allows the creation of a user/password on the fly
Troubleshooting
- If you have problems after configuring the system you can use the LogicNets OAuth Tester Application.
- Make sure you have the local-user accounts enabled and you are part of the admin user group.
- Open https://<yourlogicnetshostname>/<yourcompanyname>/oauth-tester.
- Login with your local user account.
- Select ADFS and click Next.
- Log in.
- After you have logged in successfully you can review you can see all the information the LogicNets runtime received and interpreted.
- OR if there is an error, the OAuth Tester should provide an error code and message.
(ADFS errors are well documented on the internet, with lots of scenarios and suggestions for cause/remedial action)
Tips
The following tips have come about from setting up ADFS via OAuth with clients in the past:
- initially do not set up any group assignments, until the basic connection is successful
- then create a single group assignment that matches one in the LogicNets User Management module and test
- then apply any desired email rules
- note that users authenticating via ADFS do not acquire additional group responsibilities given in the LogicNets User Management module. This means a user can be given different access via ADFS and via local login
- some ADFS connections do not use the auth_parameters. If having trouble getting to the ADFS server page, try commenting these out
- use adfs for the OAUTH MODE in the settings file if "ad" is not working (it can sometimes be a reserved word)
Reply
Content aside
- 3 yrs agoLast active
- 140Views
-
4
Following